Wednesday, June 30, 2010

My Project To-Do List

With me being out last week, and my blog swapping buddy for this week dealing with sickness, this week's Who's That has been moved to next week.  And I didn't have anything for yesterday's Handmade Goodie, either.  Sorry guys.  

But there are many projects on the horizon.  I've got a whole list.  Seriously.  Here's some of the things I hope to get done before summer's over:


Just found this today via Mod Podge Rocks and I can't wait to make one for myself!  Check out the tutorial over  at Living with Punks.


My little man would love a boy-version of this super-cool cardboard playhouse.  This one was made by the ever-so-talented Kimbo of A Girl and A Glue Gun-you can find the tutorial here.


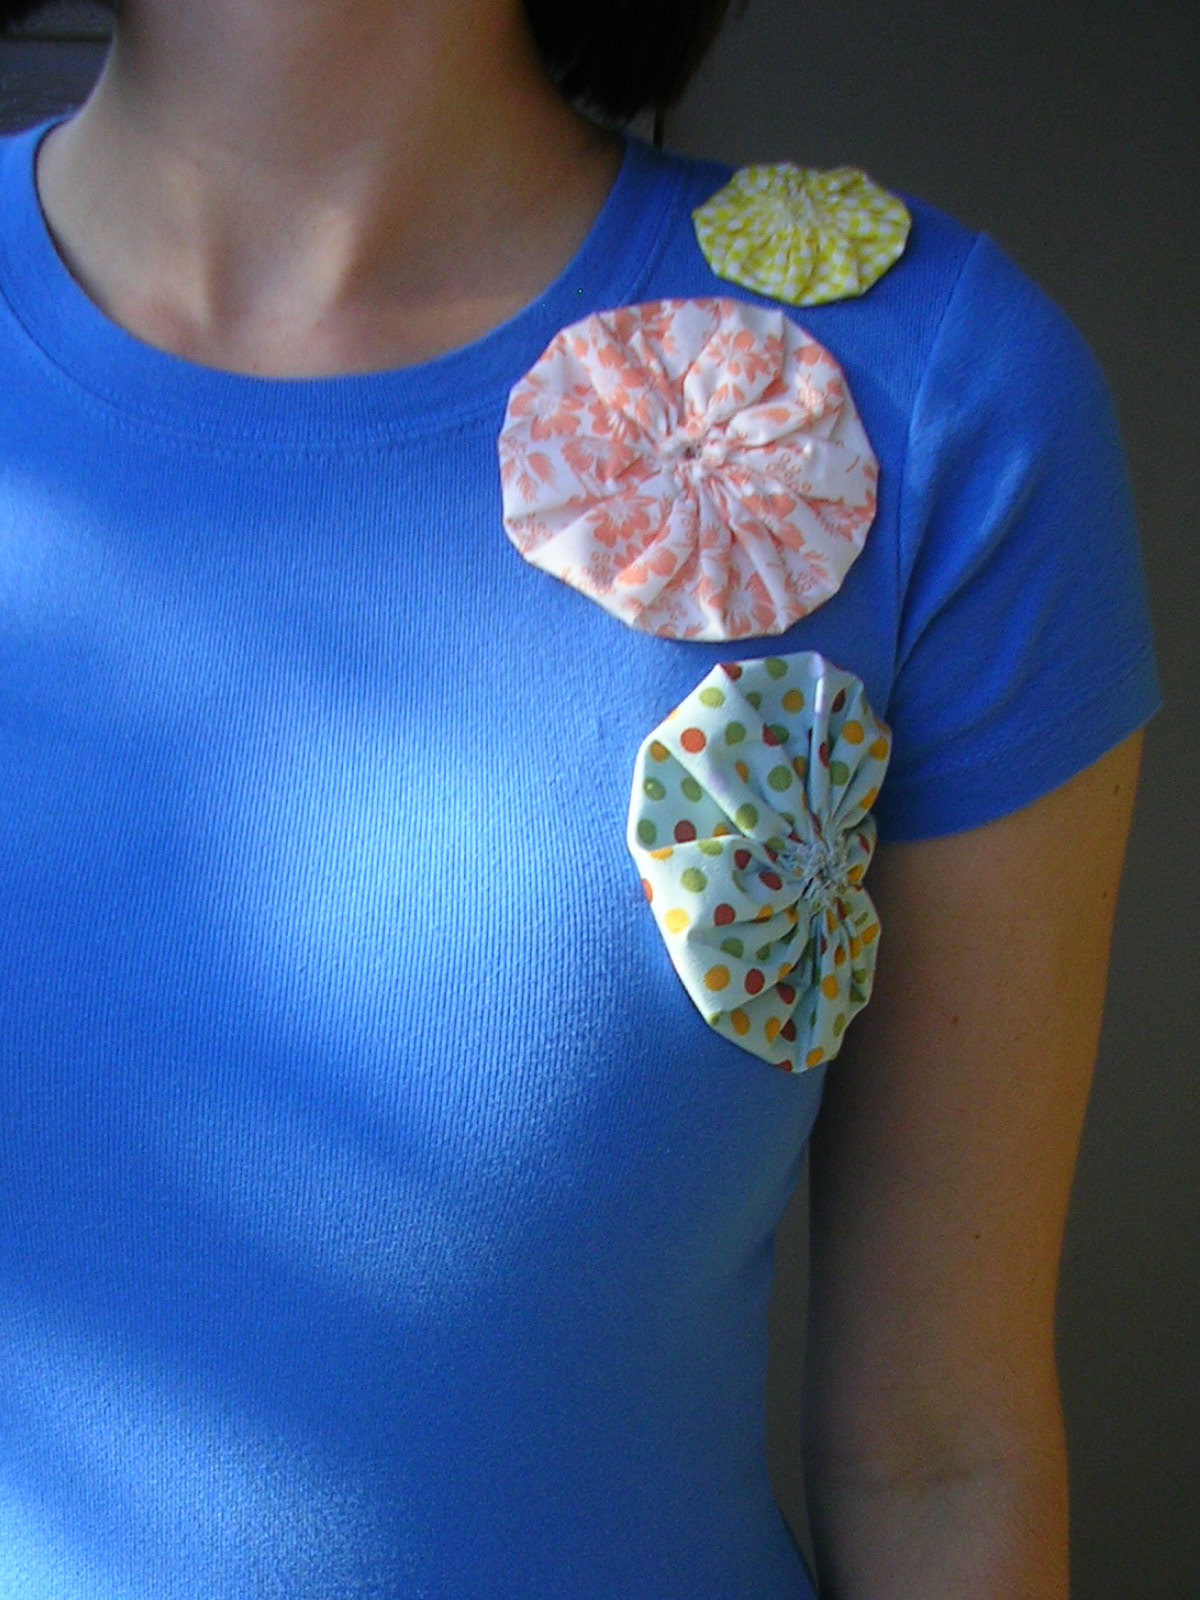
Jen from Tatertots and Jello shared this awesome Anthro-inspired tee over at 30Days and I love it!  I've already got the tees, now to just sit down and do it!


I've been wanting to make a wreath for a long time and this cardboard lovely from Elise Blaha is just what I've been looking for.


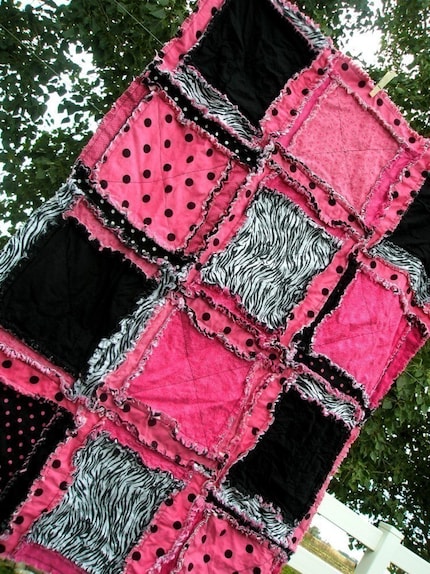
Another lovely from the uber talented Jen.  What a fun way to dress up your outfit!  Find her easy tutorial over at Tatertots and Jello.


I'll post pics of my projects as I finish them.  And there's some more that I'm working on that are all in my head, so I should have plenty to keep me busy!

Monday, June 28, 2010

Update to Screen Print Tees

I had a couple of questions about the screen printed tees I shared a couple weeks ago.  Sorry it's taken me so long to answer you-I didn't forget!

What kind of paint did you use?  I use just regular acrylic craft paint.  It doesn't wash out, fade, flake and it's not stiff once you've washed it.

Do you pre-treat your tees with anything before painting them?  Nope.  The paint stays on well enough that I don't feel I need to.  But that one is completely up to you!  To be honest, I wouldn't know what to use to pre-treat them, so sorry, I'm no help with that.

Hope that answered everything!

Friday, June 25, 2010

Fashion Fridays: Pleated Circle T-Shirt

If you didn't get a chance to check out my guest post last week over at A Vision to Remember, here's what you missed:

Pleated Circle T-Shirt Re-vamp


Today I'm sharing with you a simple way to dress up your plain Jane t-shirts.  Pleated circles are all the rage. 
We've all seen these cute "yo-yos," both in blogs and in stores.  They're really easy to make and best part is they're also fast!  To make some to dress up your shirt (or whatever else you have that needs some dressing up,) you'll need:

Fabric
Something round to trace
Needle and matching thread
Scissors


I had this pretty blue t-shirt that needed something.  I thought this would be the perfect shirt to try out those cute pleated circles on.  Sorry for the poor picture quality-it was dark and rainy outside the day I made this and our interior lights just wash everything out in photos.


I chose three fabrics that I liked and three round objects to trace.


I used a bowl for one of my circles.  Using my pencil, I traced it on the back side of my fabric, then cut it out.


Taking my needle and thread, I sewed along the edge, about1/4 inch in, all the way around the circle.


Then pulled the thread to gather it together.  Fold flat, with the gathered area in the middle.


Like this.  Then iron flat.


Arrange them on your shirt and sew in place.  I moved mine around a bit til I found an arrangement that I liked.  


And you're done!

Monday, June 21, 2010

Summer!!!


I'm going on a little mini-vacay with the hubs this week.  Kind of a spur of th moment thing.  Sans baby.  I'm a little nervous because we've never left him this long before, but I know he's in good hands.  

This also means I'm going to take a little vacay from the blog.  But I'll be back Friday with something fun.  

See you all then!

Saturday, June 19, 2010

Who's That: A Vision To Remember

Sorry I didn't get this up yesterday-we've been having some technical difficulties with the post but have gotten them all ironed out now.  I'm so excited to introduce you all to the wonderful and amazing Bobbie from A Vision To Remember!  We're blog swappin' this week, so head on over to her blog to see what I shared yesterday.  Enjoy!


I am so excited to be Blog Swapping today with Courtney! She is such an amazing person that I am honored to be here today.
I am the author of A Vision to Remember. I also have my own etsy shop, where I sell many of my creations. I am a stay at home mom of 2 awesome girls and one dog. They are my inspiration for sure. Everything that I have made has been for them in some way.

Here are a couple of things that I have made over at my blog:

I love making rag quilts. I sell many in my etsy shop, but this pattern is available for download on my blog here.


This was a fun pleated headband that I made for myself (one of the few times that I craft for myself, if you know what I mean :)


I also made this fun Ribbon skirt for my daughter (Part 1Part 2)


I also have many other tutorials on my blog. Make sure to stop by and check them out.

I also have my own Etsy shop. There I sell rag quilts, car seat tents, and lots of patterns. Some of the patterns I sell are rag quilts, belly band, and fabric flowers.


Today I am going to share with you how to make some delicious cookies. These were one of my favorites growing up. The other day I asked my mom for the recipe and made myself a batch.

Coconut Cookies
½ cup butter
2 cups sugar
2 egg whites
3 tsp vanilla
2 Tbsp. karo syrup
3 tsp baking powder
½ tsp salt
3 cups flour
3 cups coconut (add Last)


Cream butter sugar and eggs. Add karo syrup, vanilla. Add baking powder, salt and flour. Fold in coconut. Bake 350 till golden brown


Thanks again for swapping blogs with me and make sure to stop by tomorrow and link up to Check ME Out Saturday Link Party Have a great day!


Friday, June 18, 2010

For Father's Day

Where are my manners?  A few weeks ago I was the lucky winner of a Vintage Pearl giveaway from Our Family Treat!  Thanks again Lindsay for hosting the giveaway!  I'm so excited I won!


Speaking of the Vintage Pearl and giveaways, there's one going on right now, over at the Vintage Pearl, just in time for Father's Day.  Erin, the amazing artist behind all of the Vintage Pearl's amazing creations, is graciously giving away a $50 gift certificate to use for anything on the Vintage Pearl's website.  Go enter!

Wednesday, June 16, 2010

Fashion Fridays (on Wednesday): "Screen Print" Tee

Since Who's That has been moved to Friday this week, I thought it only appropriate that Fashion Friday would be on Wednesday.  So here we go!

Hand-Screen Printed Tees


We all have them in our closets and dressers: boring, plain t-shirts that need some pick-me-up.  Screen printing is a great way to do just that.  Now, not all of us are fortunate enough to own a personal screen printer.  So here's my solution.  Paint and freezer paper.  And no need to pre-treat!  To screen print your shirts, you'll need:


T-shirt
Freezer paper
Pencil
Utility knife
Paint-I just use regular ol' acrylic craft paint.  It works great.  Won't wash out or fade or peel.
*If you're doing a large area that will be all one color, spray paint works great*
Iron
Other embellishments, if desired


I like to pre-draw my designs on a drawing pad so I can tweak them and get them just how a want them.  Then I trace the design onto a piece of freezer paper, shiny side down.  This makes a stencil for you to use to "screen print" your design onto your shirt.


Using the utility knife, carefully cut out the design.  Mine is some clouds with a lightning bolt.  I saved the piece for the bolt and you'll see why in just a sec.


Iron on the design onto your shirt.  The waxy side sticks to the shirt, keeping it in place for when you paint.


Paint!  Don't forget to place something in between the layers of your shirt before you begin painting so that the paint doesn't bleed through.  I ironed in the lightning bolt piece so that I would have nice, clean lines.


Once I had painted the clouds, I took out the lightning bolt piece and painted it.  Let the paint dry and then remove the stencil.


And there you go!  If you have other embellishments that you'd like to add, go for it!  Originally I was going to add some small clear beads to the shirt as rain, but decided against it.
Like this shirt?  It's currently for sale in our Etsy shop!

Here are some of the other tees I've "screen printed."

This one is my favorite.  I did the flamingo using spray paint and did a few layers so it was thicker then cracked the paint to give it a crackled look.  No worries about it flaking off either.  I made that shirt 4 years ago and it still looks the way it did the day I made it.


This one was made as a present for a friend.


The vines on this one took FOREVER to cut out, but I think the result was worth it.


This was my first-the stars wrap around the back.

Swappin' Days and Swappin' Blogs

This week's Who's That will be on Friday this week.  I'm blog swapping with someone super-fun and that's all I can say about that for now. Don't want to ruin the surprise : )

Tuesday, June 15, 2010

Hand-made Goodie of the Week: Record Bowls

The sis-in-law and I have been working on a bunch of stuff for the Etsy shop.  Yesterday we made these:


Yep, that's a record.  Or at least, was.  You want one?  Here's how.  You'll need:

A record
An oven
Hot mitts
2 bowls, one needs to be oven-safe


Goodwill is an excellent place to look for records.  Most of these were 76 cents a piece.  And since they're at Goodwill, they're not in the best shape, so I don't feel bad melting them down.


Heat your oven to 400 degrees.  Put your oven-safe bowl in, and lay the record on top. 


Leave it in there for about 5 seconds, til it's pliable.  It WILL be hot, so use your hot mitts when handling it.


While it's still hot and bendable, drape it over your bowl and shape it around.  You could also use a large-brimmed glass.


Stick it in the fridge for a couple of minutes to cool it and set it.


And voila!  You have a unique, one-of-a-kind decoration.

If you're the instant gratification type and don't feel like hunting for records, we've got some available for sale in our Etsy shop.  Go check them out!  There's even a red one.


Monday, June 14, 2010

Oops, I've Done It Again

I feel like I've been here before.  This place where I've gotten behind and I apologize and promise to catch up and post regularly like I'm supposed to and then I don't.  So no more of that.  I'm just going to do it.

By "it," I mean keeping up with my posts like I should.

I know that there will be times where I won't be able to get to the computer, to get my posts done, because I do have a life.  A very full life, with a baby and a husband, who are demanding of my time in a way that I love.  But I don't want to feel like I need to apologize for it.  Why should I feel like I need to say I'm sorry for having a life, outside of the internet?  So when life happens, no more apologies.  I'll just get back up, and pick up where I left off.

Like this weekend.  I had every intention of posts: I have a lovely t-shirt re-vamp to share with you, some awesome guests to introduce you to and some projects I've been working on.  And I'm way behind on my tips.  But instead, I spend most of my weekend in bed, trying not to lose my lunch.  Exhaustion can do that to you, I guess.  It's just been so busy with my dad being here, then my mom was here for part of the weekend and the hubs got home from his latest business trip.  And my time just got away from me.  As it does for all of us, occasionally.

And I know that you all understand what I'm saying.  Because you have lives too.  There will be times when I will have to choose which is more important: that life or this blog.  In the grand scheme of things. blogging in near the bottom of what's important.  Not to say that you, my lovely readers and supporters, aren't important, because you most certainly are.  Without you, I'd have no reason to even worry about this blog.  So thank you!  But I think you all understand what I'm getting at.


In other news, the winner of the Fashion Friday giveaway never got in touch with me, so as promised, I've chosen another winner at random and that person is:

#1, Jill from Women Who Do It All!!!

How awesome is that?!  #1 almost never gets chosen!  Congrats, Jill!  Send me your address and I'll send you your prize :)

And I shall be back later this week with many fun things for you all.  Thank you for your patience and continued support.  I love you all!

Thursday, June 10, 2010

Giveaway and An Update

You've already heard about my love of Flirty Aprons.  Really, I'm seriously in love.  Yeah, yeah, it's only an apron.  But it's SO pretty!  Who wouldn't want to feel fancy while cooking?


The lovely Linda of Craftaholics Anonymous is graciously giving one away.  How sweet is that?!  So head on over and get your entries in.  The giveaway ends June 16.

And, I still haven't heard from the winner of the Fashion Friday giveaway.  
It was #3, Mrs. Matched.
Please get in touch with me by the end of the day tomorrow, or I will be selecting a new winner.

Wednesday, June 9, 2010

Who's That: Slacker

Well I'm not totally a slacker.  As previously mentioned, my dad was in town for my little brother's graduation and he stayed a few days afterwards to spend some time with all of us.  Today I got him all to myself, which is a rarity and was much enjoyed.  But I don't have someone to introduce to you today, because of that 
AND
as also previously mentioned, I've got an exciting surprise in the works and I'm still ironing out all of the details before I can tell you all what it is.  I was hoping that everything would be finalized in time for today, but alas, that wasn't the case.  Hey, we all have lives and things happen. I'm sure you all understand.
Things should be back to normal now.  And I have someone really neat for you to meet next week.  So never fear!

Tuesday, June 8, 2010

Hand-made Goodie of the Week: Silverware Garden Markers

In case you didn't make it over to Red Heads Craft More Fun last week to see my guest post, here is what you missed:

Silverware Garden Markers


Today I'm sharing with you how to make your very own garden markers from old silverware.  I've been seeing these popping up everywhere and decided to put my own spin on them.  All of the ones I had seen involved stamping of some sort, and I don't have stamps, so I decided to try something else.  It's a cheap, easy and fast way to dress up any garden!  To make yours, you'll need:

Various assorted silverware
Drawing paper
Fine-tip permanent marker
Mod podge and brush
Glue stick


I found a whole bunch of silverware at Goodwill for $1 a bundle and I got 4 HUGE bundles (I've got some other silverware-related projects I'd like to do so I stocked up.)  I started by going through my silverware and choosing the ones I thought would work best.  I used 4 spoons and 4 forks.  


Then, I traced around the top part of one of the spoons on the drawing paper 


to give myself a rough idea of how big the labels should be.


Then I wrote out the label (I actually ended up not using this one, so if you don't see it and get confused, you know why.)  Then I tore the paper around the word, leaving a small border and glued it onto the spoon.


Or in this case, fork.  See I left enough around the word so if I needed to trim it down a little bit more, I could.  I then painted on a thin layer of Mod Podge.  This seals it and keeps water from ruining the paper.


Let the Mod Podge dry completely, which should take about 20 minutes.


Then stick them in your garden!  And that's it!  They're really fast and easy-which is how I like things.  This is my little herb garden that I've got going on our balcony.

I've got some big news-I'm about bursting trying to keep it a secret until tomorrow!  But I promise you'll love it, so be sure to come by tomorrow : )

Related Posts Plugin for WordPress, Blogger...