






Friday, April 13, 2012

{Fashion Friday} Anthro-Inspired Bead and Fabric Necklace

I've had this one in que for a while, but then life happened {having a baby will do that to you, I guess} and I never got it posted.  Well, the wait is over and here it is!  A little bit fashion, a little bit craft and an Anthro knock off to boot!  Happy Friday :)


I saw the Anthropologie version of this necklace a ways back and silly me, I forgot to save a picture of the original, because it is no longer for sale.  But when I first saw it, I thought, cute! followed by, I could make that!  The process is a little time consuming, but the results are lovely.


To make yours, you'll need:
Striped fabric (mine was from the remnant bin at Joann's)
16 clear faceted glass beads (found mine at Michael's)
Scissors, white thread, needle, snap closure


1. Cut a strip from your fabric that is twice the width of your beads and about 24 inches long.  My beads were 1/2 inch wide so you'll need to adjust it accordingly.  You want it to be 1.5 times the length of your beads (I had 16 beads at .5 inches each, so 8 inches total.  Multiply by 3=24.  Ugh, math, I know.)  Fold it in half and do a running stitch along the raw edge-you can skip this step if you'd like.  For me, it was easier to keep the fabric from slipping apart once folded in half if it was stitched in place.


2. Take your beads and begin adding them to your fabric strip.  To do this, start about an inch, inch and a half in from one end of the fabric strip {Remember to keep it folded in half!} and make two up and down folds the same width as your bead, then add the bead, taking the fabric under the bead and repeat the folds on the other side.   


 I found it was easiest to make the folds on one side, thread the needle through the middle, then add the bead on the thread, then do the folds and thread the needle through those.


 3. Keep repeating folds, bead, folds, bead until you've used all your beads.


4. Now, for the ends.  Depending on how long you want your necklace to hang, cut two strips of your fabric, same width as your long piece.  Fold each in half and do a running stitch along the raw edges, just like with the main piece.


5. Tie one end to the tail of the beaded piece and stitch an X on the underside to keep it in place.  Repeat on the other side.


6. Sew your snap closure on the ends.


And there you have it-your very own knock off for a fraction of the original price!


post signature

Thursday, April 12, 2012

The Rustic Lily and First Friday Lakeland

My friend {and new business partner-yay!} Wita and I did our very first ever art market last Friday.  Our awesome downtown hosts an event called First Friday on the, you guessed it, first Friday of the month and a couple of times a year, there is an artisan market that is a part of the event.  The artisan market is put on by a wonderful little shop located downtown called the Black Swan Bazaar.  If you are ever in Lakeland, Florida, you seriously need to stop by.  I've literally spent hours in there, looking at all of the goodies they have for sale.  I can guarantee you won't leave empty-handed.

Me and Wita at our booth

We have been talking forever about doing something like this and when the opportunity presented itself, we decided to go for it!  Wita has joined me as co-owner of my Etsy shop, which we have re-named the Rustic Lily Boutique.  We crafted our little bums off for a week straight {because that's all the notice we had!} and hauled all of our lovely creations down to sell in the streets of downtown Lakeland.


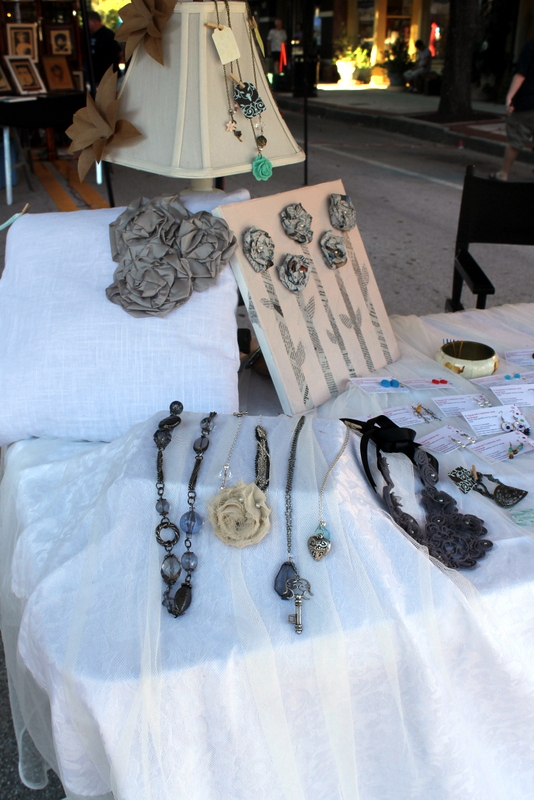
Here's a view of our booth, all set up and waiting for customers.


Our table was full of lovely items, just waiting for a new home.


The crowd!  First Friday is a big deal here, and the turnout is crazy!


Last minute finishing touches


Our wall art section


Our shop specializes in handmade jewelry, women's accessories and shabby chic home decor.  We're also working on a line for little ones.


Our earrings were our best sellers


coasters!  The chalkboard ones especially were a big hit {look for them in our shop soon!}


We are hoping to do more events like this.  While at First Friday, we learned there is a weekly Farmer's Market that is held downtown and there's a huge outdoor flea market that is going to be held at the end of the month.  We're super-excited!

Our shop is currently on vacation as we work on some new items, but we should be up and running very soon!  You can check out the Rustic Lily Boutique over on Etsy and Facebook.


post signature

Wednesday, April 11, 2012

{Blast from the Past} Photo Collage Star

This project is one of my faves and one I get asked about A LOT!  So here it is {again} for those of you who might have missed it the first time around.


A dear and super-crafty friend told me about this project back when we were looking for fun, hand-made presents for Christmas a few years' ago and we loved the idea so much, we decided to make ones for ourselves.  She found the idea over at Better Homes and Gardens but I have searched the site over and over again and I cannot for the life of me find it.  Since I couldn't find the original or a tutorial, I've made up one up based on how I did it so you can make your own!

You'll need:


-A large, metal star-preferably one without any embellishments.  You'll need a smooth surface to glue the pictures and paper to.  I found mine at Hobby Lobby, but you can find them at lots of craft stores and/or home decor stores.  (P.S. the red one above is NOT the one I used for my collage.  It's only pictured to give you an idea and it is the exact same size as the one I used.)
*The one that I used to create mine is 22 inches across.*


-Scrapbook paper in 3 coordinating prints (one sheet of each print should be PLENTY.)


-10 pictures-you will probably want to plan ahead which pictures will go where on your star so that you have the right orientation (I recommend black and white pictures if using colored scrapbook paper-it's a little too much with color photos AND color paper)
I used 4x6's for mine, but if you're using a larger star, you'll probably want a larger print.

-Glue stick-make sure it's acid-free and safe to use with photos (think scrapbooking glue)
Mod Podge and brush


-Paper and photo patterns-these fit the size and style star that I used, you may need to adjust them to fit whatever star you are using or if you want less of a border around your picture and paper pieces.  You can click on the picture to make it larger, then right-click it to download/save (print it as a regular letter-size sheet.)

How to make it:

Trace and cut out 10 paper shapes-one small and large from one piece of paper and 2 of each from the other two ("paper front" should be facing you when tracing your shapes on the paper.)


Then do the same with your pictures ("photo front" should be facing you when tracing shapes on photos.)  


Using your glue stick, glue the paper and pictures to each point.  Cover the entire back and make sure they are pressed down very firmly onto the star so that they don't bubble when you Mod Podge them.  The pattern that you cut only one of is the top point of the star and then alternate the remaining patterns on the other 4 points.


There should be a small border around each piece where the star shows through.
Once you have all of your pictures and paper glued on, apply a thin coat of Mod Podge over the entire star.  Make sure you get all the edges.  Allow 20 minutes to dry then apply another coat.


Hang and enjoy!


post signature

Tuesday, March 6, 2012

Guest Post at So You Think You Can Craft

Hey all.  I know it's been a LONG time.  And I realize I never formally announced my temporary leave of absence from blogging.  With a new little one, a toddler and school to juggle, I needed to take some time off to take care of life.  While I'm not officially back yet, I plan on having the blog "up and running" by the end of the month.

Until then, you can check out the guest post I did for Missy over at So You Think You Can Craft back in January.  

I'll see you all soon!

post signature

Thursday, November 17, 2011

Korra

Our baby girl is here!  


Miss Korra was born on November 4th (her due date!)


Meeting her big brother for the first time


This is why I'll be absent for a bit longer.  She's a wonderful baby and we are so happy she is a part of our family!


My handsome husband holding his baby girl.

Hope everyone is doing well-I'll be posting when I can!


post signature
Related Posts Plugin for WordPress, Blogger...