Showing posts with label interchangable wreath. Show all posts

Tuesday, June 21, 2011

{Hand-made Goodie of the Week} Being Patriotic

The Fourth of July is in less than two weeks, and with me {FINALLY!} getting a small break from school, I got to do some crafting, patriotic-style.  I made a red, white and blue star embellishment for my interchangeable wreath.  And it only cost me $2!

To make your own, here's what you'll need:


Wreath
Felt stars-I found mine at Joann's for only $1 per package and each package comes with 2 stars of each color
Hot glue
and velcro


I laid my stars all out to get a visual because I'm kinda dumb that way 


Then messed around with the layout.  This one was a little star-heavy for me, so I took a couple out


Until I happened upon the perfect layout.  I then carefully glued them together, then attached my pieces of velcro to the back, using the pieces on my wreath as a guide {you can check out the original tutorial for this step-it's easy peasy!}


The little man even wanted to get in on the action {really, it's just a shameless excuse to show off my cute little boy}


And ta-da!  The whole thing only took about 10 minutes, tops.  I'm going to get some blue ribbon and make a red, white and blue bow to go on it.


But it'll more than do for now.

I have another fun and easy Fourth project coming up next week-see, I told you good things were in store!


post signature

Tuesday, May 17, 2011

{Hand-made Goodie of the Week} Paper Flower Wreath Embellishment

If you weren't able to get over to She Wears Flowers last week to see what I shared with Tammy's readers, here's what you missed:

 Last fall, I made my first ever wreath.  If you've been following along for a while, you might remember it.


When spring finally rolled around, I wanted to make a pretty little something for my wreath, and since to me, flowers scream spring, I made an embellishment out of paper flowers.


Pretty and simple.  To make your own, you'll need:


Paper-I used scrapbook paper and some book pages for mine
Something to cut circles with-you could find something to trace or use a hole punch.  I used this handy-dandy gadget that I picked up a Michael's a while back.  It's by ek.
Glue


You're going to begin by cutting out 20 circles per flower for the petals.  Decide how big you'd like them.  For my small flower made out of book pages, I made each petal 1 inch.  Using my handy-dandy circle cutter, I cut out 20.


Then gently rolled them around a toothpick to curve them, like so.


Then I cut out a 2 in. circle to use as a base.  Start gluing your petals to your base as pictured above.


Slightly overlap them a bit.  Once you've come full circle,


Add your next ring of petals, gluing them down so that the top of the inner ring is just about the base of the outer ring. Repeat until you reach the middle.


Taking 3 of your remaining petals, cut them into leaf-like shapes.  Then arrange them in the very center of your flower.


Ta-da!  Repeat with the rest of your flowers.  For my larger flowers, I made the petals 2 inches and the base 4 inches.


Since they were going to be hung outside, I wanted to protect them from getting ruined.  I coated them with a clear protective spray.  I found this at Michael's.


Let them dry completely.  Then arrange them how you'd like them on your wreath, glue together where they over-lap and attach.  For mine, since the embellishments are interchangeable, I attached two pieces of velcro to the backs (you can find out more about that in the original tutorial.)


Hang and enjoy!


I'm really happy with how it turned out.  It adds a nice touch of spring to our front door.


Now my front door is all dressed up and ready for spring!

Tuesday, April 26, 2011

Easter, Easter

Hope you all had a lovely Easter!  Ours was one jam-packed weekend!  Saturday morning our ward had an Easter activity for all of the primary kids.  They did a little mini service project where they put together hygiene kits for a local shelter, then played fun Easter games and had an egg hunt at the end.

Then it was back home to clean like a madwoman-see, I had the nutty idea the week before to have our ENTIRE family (both sides) over for Easter dinner at our house-and get some homework done.  

Sunday morning came after a long night with our poor little man having bad dreams-he ended up sleeping on a little bed my hubby made up for him on our bedroom floor.  We hid his Easter basket and he had fun looking for it.  He was very happy with the goodies he found.


Then off to church we went-I had my first sharing time this past Sunday and I think it went pretty well, if I do say so myself : )


We snapped a quick family pic of us all in our Easter best before finishing up the last minute tasks around the house before our guests arrived.  I was too busy with everything to remember to get pictures of everyone while they were here, but we had 18 people in our house!  It was our first family gathering in our new place-it was a blast!


Before most everyone left, I hid the little man's eggs (we weren't able to do it earlier because it began to rain) and he had a little mini egg hunt.  
And that's our Easter in a nutshell : )

Before I packed it all up, I thought I'd give you a glimpse at my Easter decor.  We don't have much, but I add to it a little each year.


 My little bicycle bunny-she hides treats in her basket.  And see that little {bare} tree in the background?  I've got a cute Easter/Spring project planned for it, so be watching!


Her basket holds yummy Cadbury eggs.  Most of them are gone now, though : )


This little guy is from WAAAAAY back in the day-I made him at a Relief Society meeting back when I was still a Young Woman.  Talk about old.


These little chicks were a steal-I found the pair of them in the dollar section at Target.  They, of course, came home with me.  I filled each one with a different color of Easter grass and ta-da!  fast, cheap decor.  They're hanging out next to my free canvas (from Canvas People-love it!)


And here's my spring wreath.  If you've been a follower for a while, you may remember my interchangeable wreath.  I whipped up a pretty spring embellishment for it-stay tuned for the tutorial!


post signature

Wednesday, August 18, 2010

Hand-made Goodie of the Week: Interchangeable Wreath


Interchangeable Wreath


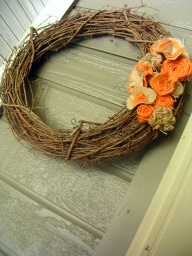
It all started with this wreath.  I've had it for a few months and it's just been sitting in my closet because I've been indecisive about what I wanted to do with it.  I didn't want to "commit" it to one look.  So I racked my brain and came up with a way to make it interchangable!  And since fall is right around the corner, I decided to start off with a fall-ish look.


I made several different kinds of burlap flowers.  This one I ruffled by sewing a line down the center, 


Then gathered it tight.


I formed it into a circle and stitched it together so it wouldn't come apart. 


I also made a few rolled flowers by cutting a strip of burlap about 1/2 inch wide, folded it in half and rolled it.


Then stitched the bottom.


I also made some orange burlap rosettes and some layered "flowers" out of the tan and orange burlap.


Here comes the "interchangeable" part: I then arranged them how I wanted on the wreath then moved them onto a piece of brown felt and hot glued them in place.  Then I trimmed the felt around the outline of the arrangement. 


I then cut two half inch pieces of velcro.


I hot glued the loop (fuzzy) side to the back of the felt.


And hot glued the hook (rough plastic) side onto the wreath.  Then I attached the felt piece onto the wreath.

There you go!  I've got a lovely fall wreath that I can change out when the idea strikes.


Here are some of the other embellishments I've made for my wreath:


I was inspired by this cute burlap wreath by Jen from Tatertots and Jello-go check hers out!  

I'm linking up to the usual parties (see the right sidebar) as well as the CSI Project's Fall challenge. 

Related Posts Plugin for WordPress, Blogger...